Asset Browser
The asset browser is used for selecting and opening asset documents. Assets can be filtered by type and path or searched for by name.

If the asset browser panel is not visible, select Panels > Asset Browser. You will notice that the asset browser will show up in two modes. The panel is constantly visible and can be interacted with at all times, to search for assets and open them via double click, or instantiate them with drag and drop. Additionally, when an object has an asset reference property, choosing Select Asset from the button menu right next to it will open another asset browser in file picker mode. Several other options are available, for example, Open Asset allows you to open the referenced asset document, which can be useful to follow a chain of asset references.
Search
The Search field in the top-left corner allows you to search for assets by name, path and GUID. The search by path or name is case insensitive. For paths, both slashes and backslashes are allowed. You can also input the GUID of an asset (for example { 1c47ee4c-0379-4280-85f5-b8cda61941d2 }).
When you type several words, an item must match all of them. A word that starts with - excludes items that match it.
A search always covers the selected folder and every folder below it, whatever the Show Items in sub-folders setting. This includes _data folders (for example the folders that hold the output of an import), which are hidden while you browse. Folders match by their own name only, so a matching folder does not bring every folder below it along. The status line of the browser says where the search looks, for example Searching "Textures" and its sub-folders. If the search finds nothing in the selected folder, the browser says No results in ... and offers Search the whole project, which keeps your search text and clears the folder filter.
Advanced Search
The Search field supports special keywords to find assets by certain criteria.
Find Asset References (ref and ref-all)
It can be very useful to know in which assets one particular asset is used. By typing ref:{asset-guid} into the search field, the asset browser will display all assets that directly reference that particular asset themselves. Using ref-all:{asset-guid} will display also all assets that are indirectly dependent on that asset.
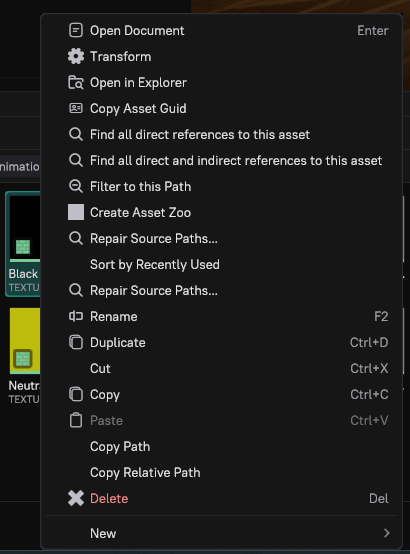
However, it is much more convenient to just right-click an asset and select Find all references to this asset. This will fill out the search field accordingly:
Filter by Asset Type
Below the search field, all available asset types are listed with checkboxes. Click the checkboxes to only display assets of those types. Click <All> or uncheck all asset types to display assets of all types.
Filter by Folder
On the bottom left the asset browser displays all data directories. When you select a folder in this tree view, the asset browser will only display assets located below that folder. Press Backspace in the tile view to go to the parent folder.
When several data directories have a folder with the same relative path (for example a Textures folder in both the engine's and the project's data), the browser shows them as one folder tile with the content of both.
The context menu of the tile view has two options for what is listed while you browse:
- Show Items in sub-folders also lists the items of all folders below the selected one.
- Show Items in hidden folders also lists the content of
_datafolders when sub-folders are shown.
Filter to this Path
You can right-click on any asset and select Filter to this Path to set the folder filter to the path in which the selected asset resides. This is useful when you already see an asset in the browser but are interested in an asset that you know is located next to that asset (same folder or sub-folder).
Create Asset Documents
You can create new asset documents by right clicking a folder on the bottom left, or an asset or empty space on the right, and selecting New > Category > Asset Type. New > Folder creates a folder.
The new asset is created right away in the selected folder (or next to the selected asset, whose name it borrows), and its name is ready to edit in its tile. Type the name and press Enter. The asset then opens. The new tile stays visible even if the type filter would hide it.
The advantage over creating a document via Editor > Create Document... is that the asset lands directly in the right location.
Working with Files and Folders
The context menu of the tile view, and the keyboard while the tiles have focus, offer these file operations:
| Command | Shortcut | Description |
|---|---|---|
| Rename | F2 | Edits the name in place, on the tile. The name is selected, so typing replaces it. Enter applies the name, Escape cancels. If the name can't be used, the tile says why and stays in edit mode. |
| Duplicate | Ctrl+D | Copies the selection next to itself. |
| Cut | Ctrl+X | Marks the selection for moving. Paste (Move) then moves it into the folder shown. |
| Copy | Ctrl+C | Marks the selection for copying. Paste then copies it into the folder shown. |
| Paste | Ctrl+V | Pastes into the folder shown. Right-click a folder in the tree for Paste into that folder. |
| Copy Path | Copies the absolute file path of each selected item to the clipboard, one per line. | |
| Copy Relative Path | Copies the path relative to the parent folder of the data directory, so it starts with the data directory's folder name, for example MyProject/Textures/Brick.plTextureAsset. | |
| Delete | Del | Deletes the selection after asking. Cancel is the default button, so Enter or Escape never delete. |
All of these work on files and folders, also on several items at once. Sub-assets and data directories can't be renamed, copied, moved or deleted.
- Copies get new GUIDs. Every copied asset document is cloned by the editor, so it gets its own GUID and does not clash with the original. A copied scene brings its layers along.
- Names. A copy keeps its name if that is free in the target folder, otherwise it is called
<name>_Copy,<name>_Copy2and so on. - Clipboard. Cut, Copy and Paste use the asset browser's own clipboard, not the Windows clipboard. Items deleted or moved away since you copied them are skipped.
- Moving source files. If you move source files (textures, meshes, ...) that assets use, the editor offers to update the assets' paths. See Repairing Source Paths.
While the project is read-only, all operations that change files are blocked.
Display Assets in Recently Used Order
The editor remembers which assets you used recently. The asset browser can list recently used assets at the top. This option can be toggled from the context menu on the right hand side of the asset browser. Note that the state of this option is remembered separately for the asset browser panel and for the asset browser when used as a file picker. In panel mode, it is typically disabled and all assets are sorted alphabetically, in file picker mode, it typically sorts by recently used time.
Copy Asset Guid
In rare cases you may need the internal GUID (Globally Unique Identifier) of an asset. You can easily copy it to the clipboard by right clicking an asset and selecting Copy Asset Guid.
Transform Assets
The asset browser allows you to quickly transform assets in multiple ways:
-
Transform All: In the toolbar of the asset browser there is a button of a white box with a red arrow. When you press this button all assets that are not up-to-date get transformed (ie. their runtime data is created from the source input data). Transform All also generates the thumbnails of the transformed assets.
-
Transform Selected: Select one or multiple assets in the asset browser, right click and choose Transform to update only the selected assets.
-
Transform Single: You can also quickly transform just a single asset by clicking the icon overlay at the bottom right of an asset's thumbnail (usually a checkmark or a gear).
Missing Source Files
Assets whose source file (texture, mesh, sound, ...) is missing get a red ? badge on their tile, and a strip in the browser says how many assets are affected. This usually means that the file was moved or renamed. Use Repair Source Paths... to find the files and update the assets. See Repairing Source Paths.
Toolbar
| Button | What it does |
|---|---|
| Check Filesystem (leftmost) | Checks for new or deleted assets on disk. See below. |
Transform All (Ctrl+Shift+E) | Runs the asset transform on all modified assets. |
| Folder panel | Shows or hides the folder tree next to the tiles. |
| Sub-folders | Show items in sub-folders: lists the assets of every folder below the selected one. |
| Tiles / List | Shows assets as thumbnail tiles or as a list. |
| Size slider | Sets the tile size. |
To open, save and close every asset document so it is written in the latest format, run EditorProcessor with -resave.
Check Filesystem
The leftmost button in the asset browser's toolbar makes the editor check the filesystem for changes that were missed by the automatic filesystem watcher. This may be useful when you added or removed assets on disk and the changes are not reflected in the editor.
Background Processing and Transform State
At the bottom right of the asset browser the curator status shows whether background processing runs, with a coloured progress bar and a play button.

The play/pause button switches background processing on and off. If enabled, outdated assets are automatically transformed in the background. The text says whether the curator is idle, running or stopping, and adds how many assets need a transform, how many have a missing dependency and how many failed, for example Curator: running · 12 need transform · 1 error. The bar shows the share of assets in each state; hover over the button for the counts. For details about processed assets and potential errors, check out the asset curator. If you do not want assets to be transformed automatically, disable background processing with the pause button.
Background processing is designed to keep the editor responsive. The asset processors run at a lower priority than the editor, no new transforms start while you are typing, clicking or dragging, and the engine process reloads finished assets in batches instead of one by one. Larger batches report their result as a notification, for example Transformed 42 assets. The settings are in the Background Processing group of the editor preferences.
Drag and Drop
You can drag assets from the asset browser into other documents, such as scenes. For mesh and prefab assets this will instantiate the asset (ie. create a new node that references the asset). For materials this may assign the material to the object that you drag it onto. Not all asset types support drag and drop. Also dragging an asset into the 3D viewport can have a different effect than dragging it into the scene tree.